How to sew cording on a pillow? Sew cording on a pillow by pinning the cording around the pillow edge and using a zipper foot to stitch close to the cording. This will encase the cording and attach it securely to the pillow.
Adding cording to a pillow can give it a professional and decorative finish. By carefully sewing the cording to the edges of the pillow, you can create a tailored and refined look. This guide will provide step-by-step instructions on how to sew cording on a pillow using a sewing machine, ensuring a neat and polished result.
Whether you are a beginner or experienced at sewing, mastering this technique will elevate your pillow-making skills and allow you to customize and embellish your decor with an elegant touch.
How to Sew Cording on a Pillow?

Introduction To Sewing Cording On A Pillow
Learn how to sew cording onto a pillow with this step-by-step guide. By following these instructions, you can achieve a professional and finished look for your pillows. No need to worry about starting too close to the cording, as we’ll be making another pass around it.
What Is Cording On A Pillow?
Cording refers to the process of adding a decorative twist cord trim to the edges of a pillow. It involves sewing a cord into the seam, which gives the pillow a professional and finished look. The cord can be made of various materials and comes in different colors to coordinate or contrast with the fabric of the pillow. By sewing cording onto a pillow, you can add a touch of elegance and sophistication to your home decor.
Why Use Cording On A Pillow?
There are several reasons why you might choose to use cording on a pillow. Firstly, it adds a decorative element to your pillow, making it stand out and creating visual interest. The cord trim can be chosen to match the color scheme of your room or to add a pop of contrasting color. Secondly, cording helps to define the shape of the pillow and give it a more structured appearance. It can make a plain pillow look more luxurious and high-end. Finally, sewing cording onto a pillow also serves a practical purpose. The cord adds durability to the seam, making it more resistant to wear and tear.
Supplies Needed
Learn how to sew cording on a pillow with these easy steps. All you need are some basic supplies and you’ll be able to add a professional touch to your pillows.
Cording
One of the essential supplies needed for sewing cording on a pillow is the cording itself. It’s usually a thick rope-like material used to add a decorative edge to pillows.
Fabric
Choosing the right fabric is crucial for creating a visually appealing and durable pillow. Opt for a fabric that complements the cording and the overall design of your pillow.
Scissors
Sharp scissors are necessary for cutting the fabric and cording precisely. Ensure you have a pair of scissors specifically designed for fabric to achieve clean cuts.
Thread
High-quality thread is essential to ensure the durability of your pillow. Select a thread color that matches the fabric and cording to create a seamless finish.
Sewing Machine
A reliable sewing machine is indispensable for efficiently stitching the fabric and cording together. Make sure your machine is in good working condition before starting the project.
Preparing The Cording
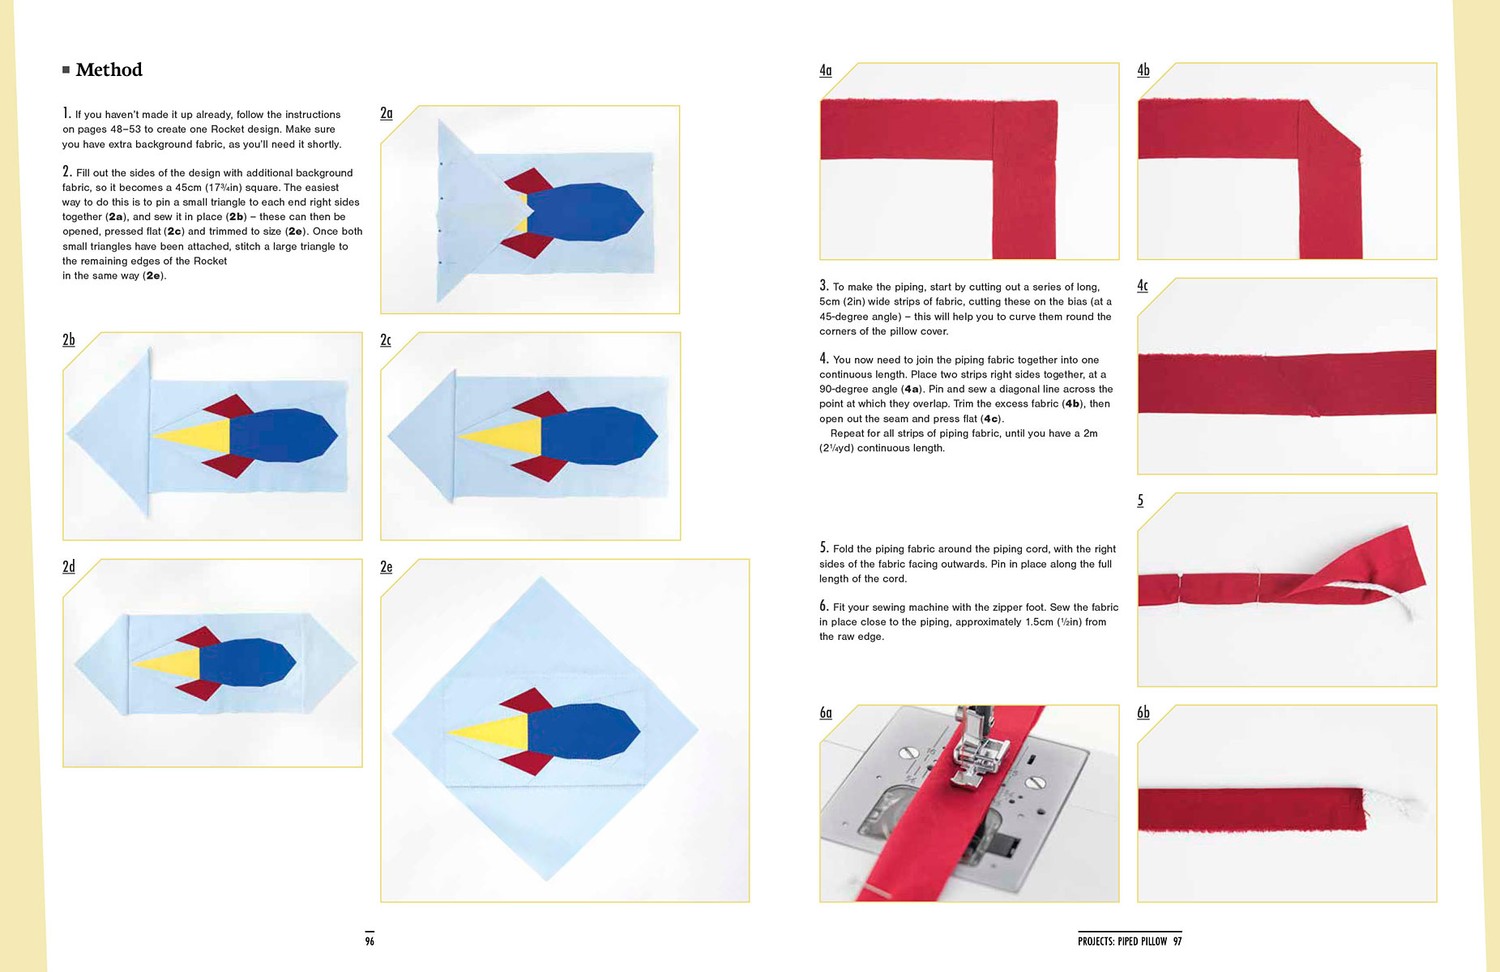
When preparing the cording for sewing on a pillow, make sure to measure and cut it to the proper length. Use a zipper foot on your sewing machine to attach the cording to the fabric. Sewing cording into a pillow cover is a great way to add a decorative touch to your home decor.
Measuring And Cutting The Cording
Sewing cording on a pillow starts with measuring and cutting the cording to the required length. Use a measuring tape to determine the required length, ensuring precision for a professional finish. After measuring, carefully cut the cording using sharp fabric scissors to avoid fraying.
Stitching The Ends Of The Cording
Before attaching the cording to the pillow, it’s crucial to properly stitch the ends. Start by folding and tucking in the raw edges to prevent unraveling. Using a sewing machine, create a secure stitch that encapsulates the ends, ensuring a neat appearance and durability.

Attaching The Cording To The Pillow
To attach the cording to the pillow, carefully align the cording along the pillow’s edge and secure it with pins. Using a zipper foot, sew close to the cording, ensuring to catch the cording securely without stitching through it. Trim any excess cording and continue sewing the pillow as desired.
Pinning The Cording To The Pillow Fabric
In order to attach the cording to the pillow fabric, you’ll first need to pin it in place. Start by positioning the cording along the edge of the fabric where you want it to be sewn. Make sure that the raw edges of the cording are aligned with the raw edges of the fabric. Using straight pins, pin the cording in place at regular intervals, making sure that it is secure and evenly aligned along the entire edge.
Sewing The Cording To The Pillow Fabric
Once you have pinned the cording in place, it’s time to sew it to the fabric. Use a zipper foot on your sewing machine to make it easier to sew close to the cording. Start sewing at one end of the cording, making sure to backstitch to secure the stitching. Sew all the way along the edge, staying as close to the cording as possible. Take your time and sew slowly to ensure a neat and even stitch. Remove the pins as you sew, being careful not to sew over them.
Finishing The Ends Of The Cording
To finish the ends of the cording and give it a clean look, you can either fold the ends under or create a fabric loop. If you choose to fold the ends under, simply trim the cording so that it extends about 1 inch beyond the edge of the fabric. Then fold the excess cording under and secure it with a few hand stitches or fabric glue.
If you prefer to create a fabric loop, cut a small piece of fabric that is about 2 inches wide and long enough to wrap around the end of the cording. Fold the fabric in half lengthwise and sew along the long edge to create a tube. Turn the tube right side out and slide it over the end of the cording, folding the raw edges inside. Secure the fabric loop in place with hand stitches or fabric glue.
By following these steps, you can easily attach cording to a pillow and give it a professional and polished look. Whether you’re a beginner or an experienced sewer, sewing cording on a pillow is a fun and rewarding project that will add a decorative touch to your home decor.
Finishing The Pillow
Once you have sewn the panels together and stuffed the pillow, it’s time to finish the pillow by closing it up. This final step ensures that your pillow is secure and that the cording is neatly attached. Follow the steps below to complete the process.
- Place the two pillow panels with right sides facing each other.
- Align the edges and pin them in place.
- Using a sewing machine, stitch around the perimeter of the pillow, leaving a small opening for turning and stuffing.
- Make sure to backstitch at the beginning and end of your stitching to secure the seam.
- Turn the pillow right side out through the opening you left.
- Use a stuffing material, such as polyester fiberfill, to fill the pillow to your desired level of fullness.
- Ensure that the stuffing is evenly distributed throughout the pillow.
- Fold the raw edges of the opening inside the pillow and pin them together.
- Using a needle and thread or a sewing machine, stitch the opening closed with small, even stitches.
- Make sure to secure your stitches at the beginning and end to prevent unraveling.
And voila! Your pillow is now complete. Take a moment to admire your handiwork and enjoy your beautifully finished pillow.

Conclusion
Sewing cording on a pillow can add a decorative touch and a professionally finished look to your home decor. By following the steps outlined in this blog post, you can easily attach cording to your pillow and create a unique and stylish design.
Whether you choose to use twist cord trim, lip cording, or welt cord, sewing cording onto a pillow is a simple yet effective way to enhance the overall aesthetic of your space. So grab your sewing supplies and get ready to transform your pillows into works of art.

