
How to make a pillow sham, cut your fabric to the desired size, hem the back panels, and sew them together. Making a pillow sham is a simple and creative way to add a decorative touch to your bedding.
Whether you’re a novice or an experienced sewer, creating a custom pillow sham allows you to personalize your bedroom decor. By following a few easy steps, you can make a stylish pillow sham that complements your bedding, matches your bedroom decor, and adds a touch of elegance to your sleeping space.
In this guide, you will find step-by-step instructions on how to make a pillow sham, along with helpful tips and ideas to inspire your creativity. Let’s dive in and explore the process of making a beautiful pillow sham!
How to Make a Pillow Sham?
Materials Needed
To make a pillow sham, you’ll need fabric for the front and back panels, cotton batting, fusible fleece, a sewing machine, and basic sewing supplies. These materials will help you create a stylish and comfortable pillow sham for your bedroom décor.
Materials Needed:
Before you start making your pillow sham, make sure you have all the necessary materials. Here is a list of what you’ll need:
- Fabric: Choose a fabric that complements your existing home decor and is suitable for pillow sham making. Consider the color, pattern, and texture of the fabric.
- Batting or fleece: This will provide extra padding and structure to your pillow sham. Batting is typically used for lightweight shams, while fleece is more suitable for thicker shams.
- Thread: Select a thread color that matches or complements your fabric for a seamless finish.
- Sewing machine: A sewing machine will make the sewing process much faster and more efficient. Make sure it is in good working condition before you begin.
- Scissors: You’ll need a good pair of fabric scissors to cut your fabric and trim excess threads.
- Measuring tape: Accurate measurements are crucial to ensure a well-fitted pillow sham. A measuring tape will help you achieve this.
- Pins: Pins are essential for holding fabric pieces together during sewing. They will keep everything in place and prevent shifting.
Once you have gathered all these materials, you are ready to start making your pillow sham. Follow the next steps in our tutorial to create a beautiful and customized pillow sham for your home.
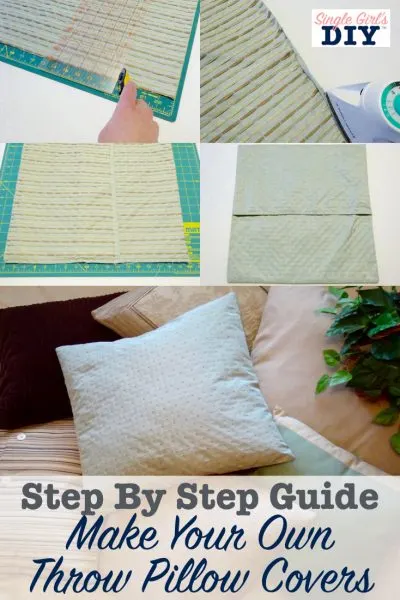
Measuring And Cutting
Making a pillow sham is a great way to add a personal touch to your bedroom decor. In this section, we’ll go over the essential steps of measuring and cutting your fabric. By following these steps carefully, you’ll be on your way to creating a beautiful pillow sham that perfectly fits your pillow.
Measuring Your Pillow
Before you start making a pillow sham, it’s crucial to measure your pillow accurately. Use a tape measure to determine the length, width, and thickness of your pillow. Take these measurements to ensure the pillow sham fits snugly around your pillow, giving it a polished and professional appearance.
Calculating Fabric Dimensions
Next, calculate the fabric dimensions based on the measurements of your pillow. To accommodate the thickness of your pillow and provide ample seam allowance, add 1 inch to both the length and width measurements. This additional inch will allow for a comfortable fit and ease of insertion and removal of the pillow from the sham.
Cutting The Fabric
Once you’ve determined the fabric dimensions, carefully cut the fabric according to these measurements. Use fabric scissors or a rotary cutter and a cutting mat to ensure straight, precise cuts. It’s essential to cut the fabric accurately to avoid any misalignment or bunching when sewing the sham together.
Assembling The Front
Assembling the front of a pillow sham involves several important steps to achieve a professional and polished look. By following the process carefully, you can create a beautiful pillow sham that will enhance the appearance of your bedding ensemble. Let’s break down the process into the following steps.
Laying Out The Front Fabric
Begin by laying out your selected fabric for the front panel of the pillow sham on a flat surface. Ensure that the fabric is free from any wrinkles or folds to provide a smooth and even foundation for the next steps.
Attaching Fusible Fleece Or Batting
Next, attach the fusible fleece or batting to the wrong side of the front fabric panel. Position the fusible fleece or batting carefully, following the manufacturer’s instructions for proper adhesion.
Sewing The Front Panels Together
Once the fusible fleece or batting is attached, it’s time to sew the front panels together. Place the front fabric panels with right sides facing each other and sew along the designated seams, ensuring precision and even stitching throughout the process. This step is crucial in creating a seamless and aesthetically pleasing front panel for your pillow sham.
Creating The Back

Making a pillow sham from scratch allows you to personalize your bedroom decor and add a touch of style. When it comes to creating the back section of the pillow sham, there are a few essential steps to follow. In this guide, we will cover how to cut and hem the back panels, as well as how to attach them to the front fabric. Lastly, we’ll discuss trimming the excess fabric to achieve a clean and polished finished product.
Cutting And Hemming The Back Panels
The first step in creating the back of your pillow sham is to cut out the fabric for the back panels. Start by measuring the width of your front fabric panel and determine how wide you want your pillow sham to be. Add an additional inch for a seam allowance. Using these measurements, cut two rectangular pieces of fabric that match the length of the front panel and the desired width.
Next, it’s time to hem the back panels. Fold over one of the long edges of each back panel about ½ inch and press it down with an iron. Then, fold it over again by about ½ inch and press it down once more. Secure the hem with straight pins and sew a straight stitch along the folded edge.
Attaching The Back Panels To The Front
With the back panels hemmed and ready, it’s time to attach them to the front fabric panel. Lay the front fabric panel with the right side facing up. Take one of the back panels and place it on top of the front panel, aligning the raw edges together. The hemmed edge should be facing towards the center of the front panel. Repeat this step with the second back panel on the opposite side.
Pin the back panels in place, ensuring that they are evenly and securely attached to the front panel. Sew a straight stitch along the outer edges of the pillow sham, removing the pins as you go along. This will secure the back panels to the front fabric and create a complete pillow sham.
Trimming Excess Fabric
Once you have sewn the back panels to the front fabric, it’s essential to trim any excess fabric to achieve a clean and professional look. Use fabric scissors to carefully trim the excess fabric along the outer edges of the pillow sham, making sure not to cut into the stitches. This step is crucial to ensure that your pillow sham looks neat and tidy.
Now that you have completed the process of creating the back of your pillow sham, you can flip it right side out and admire your work. The back panels should be securely attached to the front fabric, creating a beautiful and functional pillow sham that adds a touch of style to your bedroom decor.
Finishing Touches

Learn how to make a stylish pillow sham with a few easy steps. Measure your pillow, assemble front fabric, sew back panels together, and trim excess fabric for a professional finish. Personalize your bedroom decor with this simple DIY project.
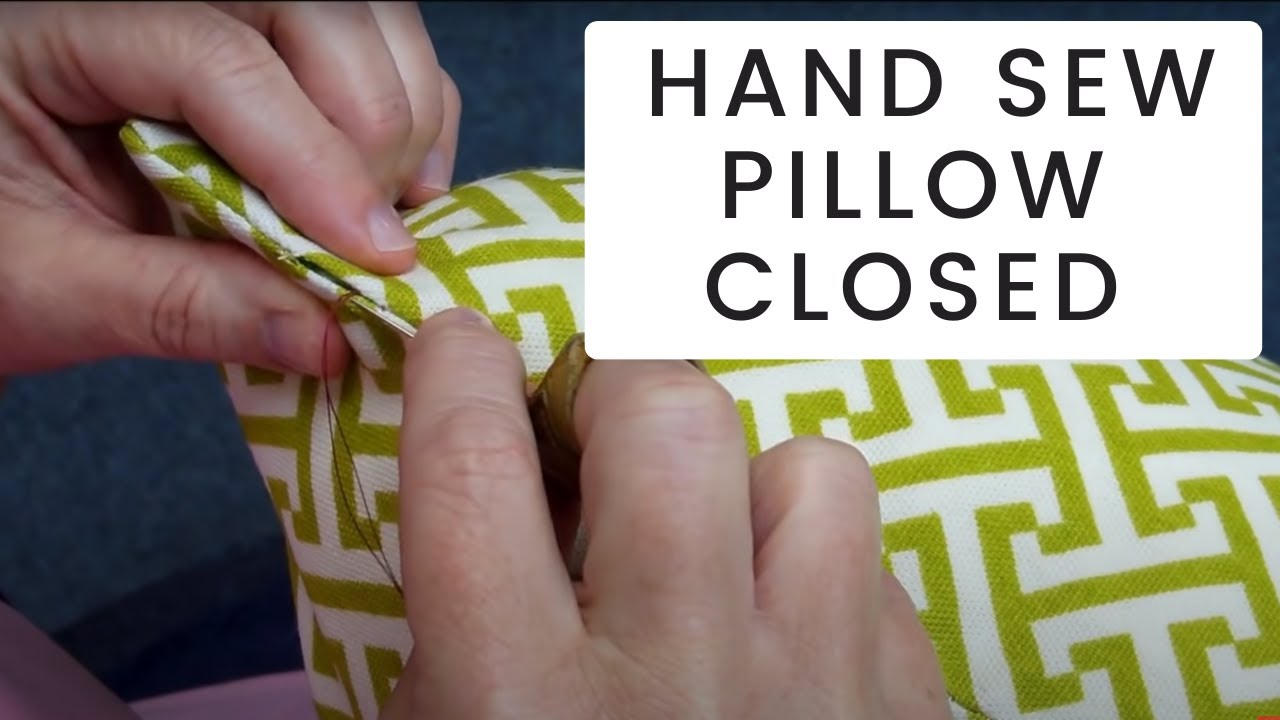
Turning The Sham Right Side Out
Once you have sewn the front and back panels of your pillow sham together, it’s time to turn it right side out. This step is crucial to ensure a clean and professional finish. Carefully reach inside the sham and pull the fabric through the opening, turning it completely. Take your time to smooth out any wrinkles or creases, ensuring that the corners are pushed out fully for a crisp look.
Pressing And Topstitching
To give your pillow sham a polished appearance, it’s important to press it. Use a hot iron and press each seam open, flattening the fabric. Pay special attention to the corners, making sure they are pressed neatly. This will create sharp corners and smooth edges. Once pressed, you can also choose to topstitch around the edges of the sham for added durability and a decorative touch. Topstitching not only secures the seams but also gives the sham a professional finish.
Adding Decorative Elements
To elevate the look of your pillow sham, consider adding decorative elements such as piping, ruffles, or trim. Piping can be inserted along the edges of the sham to create a clean and tailored look. Ruffles can add a touch of whimsy and texture, while trim can bring in a pop of color or pattern. Before attaching any decorative elements, make sure to pin them in place to ensure they are centered and evenly distributed. Once pinned, stitch them securely to the sham, either by hand or with a sewing machine. These finishing touches will truly make your pillow sham stand out and add personality to your home decor.
Conclusion
To wrap up your pillow sham-making journey, you’ve learned how to measure your pillow, assemble the front fabric, and sew the back panels together. The final steps include attaching the back to the front, trimming excess fabric, and achieving a polished finish.
With these simple instructions, you can create personalized pillow shams to enhance the aesthetic of your bedroom decor. Start crafting and enjoy the satisfaction of beautifying your space with handmade creations.