
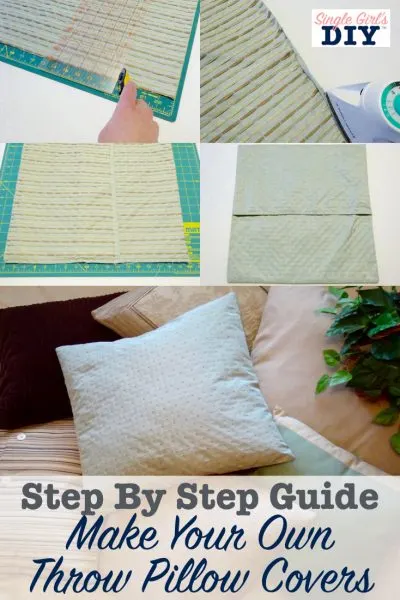
How to make pillow covers, cut fabric to size, hem the edges, and sew the cover together. Insert the pillow form, and finish.
Making pillow covers requires measuring and cutting fabric, sewing hems, and assembling the cover. Creating your own pillow covers can be a fun and straightforward DIY project. With just a few simple steps, you can customize your home décor and refresh your living space inexpensively.
This guide will take you through the process of making pillow covers from scratch, giving you the confidence to experiment with various fabrics, patterns, and designs. By following these instructions, you’ll be able to create beautiful, custom pillow covers that match your unique style and aesthetic preferences. So, let’s get started and learn how to make pillow covers with ease!
Supplies Needed
Making your own pillow covers can be a fun and rewarding project, allowing you to customize your home decor to fit your personal style. To get started, you’ll need a few essential supplies. Here is a list of required materials you will need for this DIY project:
List Of Required Materials
Before you begin, make sure you have the following supplies on hand:
- Fabric of your choice – Make sure to select a fabric that complements your home decor and is suitable for pillow covers. You will need enough fabric to cover the front and back of each pillow.
- Measuring tools – A measuring tape or a ruler will be needed to accurately measure the dimensions of your pillows and fabric.
- Scissors – Sharp fabric scissors are crucial for cutting the fabric cleanly and precisely.
- Sewing machine – A sewing machine makes the process faster and more efficient, but you can also hand sew if you prefer.
- Thread – Choose a thread color that matches or complements your fabric.
- Pins – Straight pins will be used to secure the fabric pieces together before sewing.
- Iron – An iron is necessary for pressing the fabric and creating crisp edges.
- Pillow inserts – Don’t forget to have pillow inserts or stuffing ready to insert into your finished covers.
Once you have gathered all the necessary supplies, you are ready to start making your own pillow covers. Follow the step-by-step tutorials available online or refer to expert advice to guide you through the process. Get creative and have fun with fabric choices and patterns to bring a personalized touch to your home decor!
How to Make Pillow Covers?
Measuring And Cutting The Fabric
When it comes to making pillow covers, one of the most important steps is measuring and cutting the fabric. This step determines the fit and overall look of your pillow covers. Whether you are making covers for new pillows or giving a fresh update to existing ones, accurate measurements and precise cutting are key to achieving a professional finish. In this section, we will guide you through the process of measuring your pillow form size, as well as provide tips to prevent fabric fraying.
Measurements For Pillow Form Size
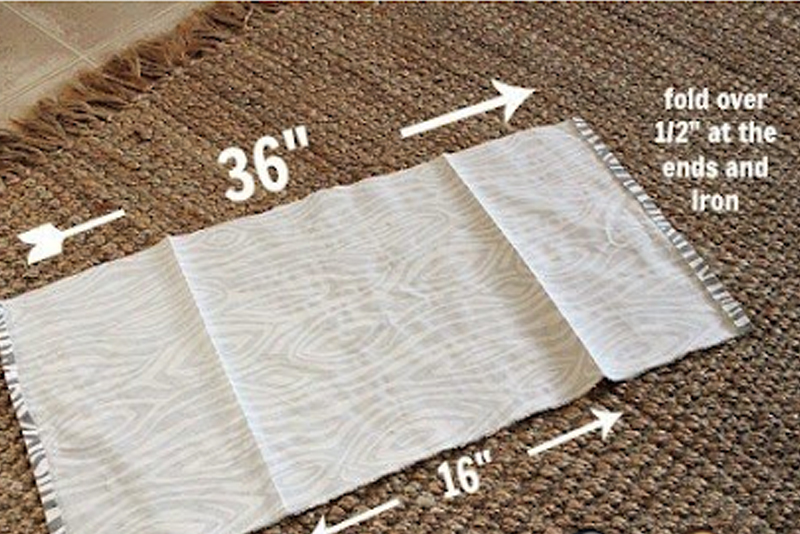
Before you start cutting the fabric for your pillow cover, you need to take proper measurements of your pillow form. This ensures that the cover fits snugly and looks neat. To determine the dimensions, measure the width, length, and height of your pillow form. Make sure to measure from seam to seam, rather than edge to edge, for accurate results.
To calculate the fabric size needed, add the height and width measurements together and then add a seam allowance of about 1 inch (2.5 cm) to each side. For example, if your pillow form is 16 inches (40.6 cm) square, you will need to cut a piece of fabric that is approximately 18 inches (45.7 cm) square.
| Width of Pillow Form | Length of Pillow Form | Fabric Width Needed | Fabric Length Needed |
| 16 inches (40.6 cm) | 16 inches (40.6 cm) | 18 inches (45.7 cm) | 18 inches (45.7 cm) |
| 18 inches (45.7 cm) | 12 inches (30.5 cm) | 20 inches (50.8 cm) | 14 inches (35.6 cm) |
These measurements are approximate and may vary depending on the type of pillow form and the style of pillow cover you choose. It’s always a good idea to double-check your measurements before cutting the fabric.
Tips To Prevent Fabric Fraying
When cutting fabric for pillow covers, it’s important to prevent fraying to ensure clean edges and durability. Here are some tips to help you prevent fabric fraying:
- Use pinking shears: Pinking shears have zigzag blades that help reduce fraying.
- Apply fabric fray glue: Dab a small amount of fabric fray glue along the cut edges to seal the threads.
- Sew a zigzag stitch: Use a sewing machine to sew a zigzag stitch along the cut edges, which helps secure the fabric and prevent fraying.
- Use fabric selvage: If your fabric has a selvage edge, you can incorporate it into your pillow cover design, as selvage edges are typically resistant to fraying.
Following these tips will ensure that your fabric edges stay intact and give your pillow covers a polished look.
Now that you know how to measure and cut the fabric for your pillow covers, it’s time to move on to the next step: hemming the fabric. Stay tuned for the next section where we will guide you through the process of hemming and preparing the fabric.
Sewing The Pillow Cover

Making your own pillow covers can be a fun and rewarding project, allowing you to customize your home decor. When sewing the pillow cover, there are a few key steps to follow to ensure a professional finish.
Hemming The Fabric Edges
Before starting the actual sewing process, it’s important to hem the fabric edges. This will prevent fraying and give your pillow cover a neat, polished look. Fold the edges of the fabric over by about half an inch and press them with an iron to create a crisp edge.
Sewing The Seams
Once the edges are hemmed, it’s time to sew the seams of the pillow cover. Using a sewing machine or needle and thread, carefully stitch along the edges of the fabric, ensuring that the stitches are straight and secure. This step will create the basic structure of your pillow cover.
Creating The Back Flap
To allow for easy insertion and removal of the pillow form, it’s essential to create a back flap on the pillow cover. This can be achieved by overlapping the fabric on the back side of the cover, creating a simple envelope closure. Secure the edges with additional stitching to ensure the flap stays in place during use.
Finishing Touches
Once you have completed sewing the main body of the pillow cover, it’s time to add the finishing touches to bring your project to completion. This final step involves turning the pillow cover right side out, inserting the pillow form, and making any final adjustments to ensure a perfect fit.
turning The Pillow Cover Right Side Out
With the seams securely sewn, begin by carefully turning the pillow cover right side out. This can be done by reaching inside the cover and pulling the fabric through the opening. Take your time to make sure all corners are properly turned and the cover is fully reversed, revealing the decorative side.
inserting The Pillow Form
Next, it’s time to insert the pillow form into the cover. Gently fold the pillow form in half, and then carefully slide it inside the cover. Begin by inserting one end of the form into the opening, and then slowly unfold it as you guide it all the way into the cover. Ensure that the form is positioned evenly and fits snugly into the corners.
final Adjustments And Finishing
Once the pillow form is securely inside the cover, it’s time to make any final adjustments. Take a moment to smooth out any wrinkles or lumps that may have formed during the insertion process. Ensure that the form is evenly distributed within the cover to create a balanced and visually appealing look.
Now, carefully inspect the edges of the pillow cover to ensure they are aligned properly. If needed, you can use your fingers to gently adjust the fabric or give it a final press with an iron. This will help create clean lines and give your pillow cover a professional finish.
Finally, once you are satisfied with how your pillow cover looks, close the opening using a straight stitch or a slip stitch. This will secure the pillow form inside and prevent it from slipping out over time. Trim any excess threads, and your pillow cover is ready to be displayed and enjoyed!
Conclusion
Making pillow covers can be a simple and enjoyable DIY project. By following the steps outlined in this blog post, you can create custom pillow covers that add a personal touch to your home decor. Remember to measure your fabric carefully, hem the edges, and sew the seams securely.
Whether you prefer envelope-style covers or ones with zippers, there are plenty of tutorials available online to guide you through the process. So grab your sewing supplies and get started on making beautiful pillow covers for your space.