
How to sew an envelope pillow cover , measure and cut your fabric to fit the pillow form, then hem the edges and sew the seams to create the cover. Adding a touch of personality and color to your home decor is as easy as crafting your own envelope pillow cover.
This simple sewing project only requires about a ½ yard of fabric, making it an ideal choice for beginners or anyone looking for a quick and satisfying DIY. With endless possibilities to embellish these covers, you can truly make them your own.
In this guide, we’ll walk you through the process of creating a stylish and functional envelope pillow cover that will add a charming touch to any sofa or bed. Whether you’re a seasoned crafter or just starting out, this project is sure to inspire your creativity and bring a personalized touch to your living space.
How to Sew an Envelope Pillow Cover?

Materials And Tools Needed
Making your own envelope pillow cover is a great way to add a new pop of color to your couch or bed. It’s a super simple sewing project and it only takes about a ½ yard of fabric. There are so many ways to embellish these envelope pillow covers.
Fabric
When you are choosing the fabric for your envelope pillow cover, it’s important to consider both the design and the durability. You want a fabric that not only complements your existing decor but also holds up well to daily use. Some popular options include cotton, linen, and polyester blends. Choose a fabric that matches your style and taste, and make sure you have enough fabric to accommodate the size of your pillow.
Scissors
A good pair of scissors is essential for any sewing project, including making an envelope pillow cover. Look for a pair of fabric scissors that are sharp and comfortable to hold. Sharp scissors will make cutting the fabric easier and more precise, ensuring clean edges for your pillow cover.
Measuring Tape
Accurate measurements are key to sewing a perfect envelope pillow cover. A measuring tape is a must-have tool to measure the size of your pillow form and determine the dimensions of your fabric pieces. Make sure your measuring tape is flexible and easy to read.
Pins
Pins are helpful for temporarily holding the fabric in place while you sew. They ensure that the fabric stays aligned and doesn’t shift during the sewing process. Look for sharp, sturdy pins that will securely hold your fabric without leaving marks.
Sewing Machine
While it is possible to sew an envelope pillow cover by hand, using a sewing machine will make the process much faster and more efficient. If you don’t already own one, consider borrowing or renting a sewing machine to complete this project. Make sure the machine is in good working condition and has the necessary stitches and accessories.
Measuring And Cutting The Fabric
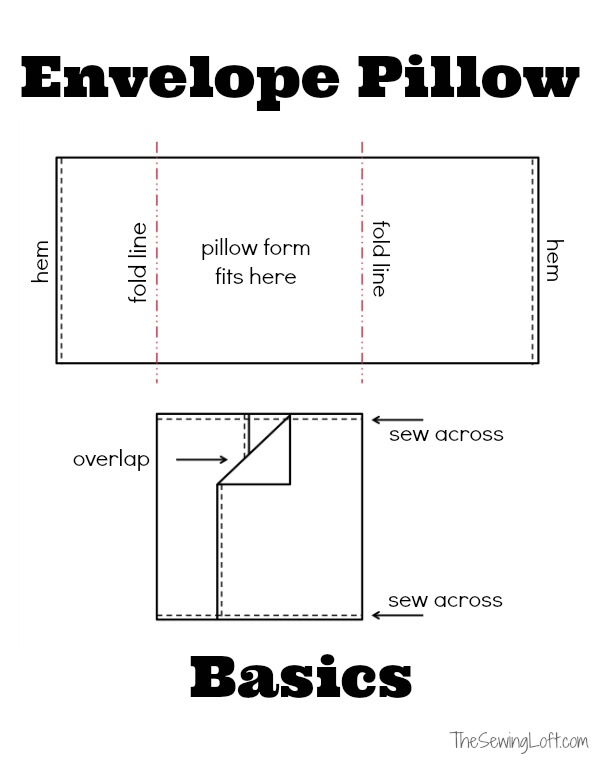
When it comes to sewing an envelope pillow cover, the first step is measuring and cutting the fabric. This is a crucial stage as precise measurements and clean cuts will ensure a professional-looking finish for your pillow cover. Let’s break down the process into three key steps: determining the pillow form size, calculating fabric measurements, and cutting the fabric.
Determining The Pillow Form Size
Determining the size of the pillow form is essential to create a well-fitting cover. Measure the width and length of the pillow form from seam to seam, and record these measurements to use when calculating the fabric size.
Calculating Fabric Measurements
Calculate the fabric size by adding 1 inch to the width and 6 inches to the length of the pillow form measurements. The additional length allows for an overlap to secure the pillow within the cover. Ensure to account for seam allowances in your calculations.
Cutting The Fabric
Using the measurements calculated, carefully mark and cut the fabric, ensuring precision to achieve neat edges. If using patterned fabric, pay attention to alignment. Once the fabric is cut, it’s time to proceed to sewing the envelope pillow cover.
By following these steps for measuring and cutting the fabric, you’re setting the groundwork for a flawless envelope pillow cover that will beautifully complement your living space.
Preparing The Fabric
Making your own envelope pillow cover is a great way to add a new pop of color to your couch or bed. It’s a super simple sewing project and it only takes about a ½ yard of fabric. There are so many ways to embellish these envelope pillow covers.
Preventing Fraying With Zigzag Stitch
When cutting out the fabric for your envelope pillow cover, prevent fraying by using a zigzag stitch along the edges. This will help secure the fabric and prevent it from unraveling during the sewing process.
Ironing Hems For Neat Edges
Before sewing, iron the hems of your fabric to create neat edges. This process ensures that your pillow cover will have a clean and professional finish. Properly ironed hems will make your sewing process much smoother and help achieve a polished final result.
Sewing The Envelope Pillow Cover
Learn how to sew an envelope pillow cover with this easy tutorial. Add a pop of color to your couch or bed by making your own pillow cover with just half a yard of fabric. Embellish it in various ways for a personalized touch.
Sewing The Hems
To start sewing your envelope pillow cover, you’ll first need to sew the hems. Begin by folding over one edge of your fabric by 1/4 inch, pressing it down with an iron to create a crisp edge. Then, fold it over again by another 1/4 inch and press it down once more. Repeat this process for the remaining three edges of your fabric, ensuring that all hems are neatly folded and pressed.
Creating The Back Flap
Next, you’ll create the back flap of your envelope pillow cover. Take one of the hemmed edges of your fabric and fold it over towards the center of the fabric, ensuring that it overlaps the other hemmed edge by a few inches. Press it down with an iron to create a crease, and then pin it in place to keep it secure. This back flap will allow you to easily insert and remove the pillow form.
Sewing The Pillow Cover Seams
Now it’s time to sew the seams of your envelope pillow cover. Starting from one corner, use a sewing machine or needle and thread to sew a straight stitch along each side of the pillow cover, approximately 1/2 inch from the edge. Be sure to backstitch at the beginning and end of each seam to reinforce the stitching.
Repeat this process for all four sides of the pillow cover, taking care to sew straight and evenly. By following these simple steps, you can easily sew your own envelope pillow cover. Remember to accurately measure your pillow form and choose a fabric that complements your home decor. With just a few materials and some basic sewing skills, you’ll have a beautiful and personalized pillow cover in no time. Happy sewing!
Finishing Touches
After you have finished sewing the seams of the envelope pillow cover, it’s time to turn it right side out. This step is crucial to ensure that the finished pillow cover looks neat and professional.
To turn the pillow cover right side out, follow these simple steps:
- Carefully reach inside the pillow cover and find one of the corners.
- Gently pull the fabric through the corner to start turning the cover right side out.
- Continue pulling the fabric until the entire cover is flipped and the right side is facing out.
- Use your fingers or a blunt object to push out the corners so they are nice and crisp.
Now that the pillow cover is turned right side out, it’s time to insert the pillow form. This step will give your pillow cover its full and plush shape. Follow these instructions to insert the pillow form:
- Take your pillow form and fold it in half lengthwise.
- Insert the folded pillow form into the opening of the pillow cover.
- Unfold the pillow form inside the cover so that it fills up the entire space.
- Use your fingers to adjust the shape of the pillow form and make sure it fits snugly.
Now that the pillow form is inserted, it’s time to close the envelope and secure the pillow cover. There are a few different ways you can do this, depending on your sewing preferences and the final look you want to achieve.
Here are two popular methods for closing the envelope:
Method 1: Finish With Pinking Shears
If you want a clean and simple finish, you can use pinking shears to trim the edges of the envelope flap. This will prevent the fabric from fraying and create a neat and professional look.
Method 2: Finish With A Zig Zag Stitch
If you want a more secure closure and added durability, you can use a zig zag stitch to sew along the edge of the envelope flap. This will prevent the fabric from fraying and ensure that the pillow cover stays closed.
Whichever method you choose, make sure to trim any loose threads and give your pillow cover one final press with an iron to smooth out any wrinkles.
And there you have it! Your envelope pillow cover is complete and ready to add a touch of style to your home. Now you can enjoy the satisfaction of creating something beautiful with your own two hands.

Conclusion
Sewing an envelope pillow cover is a simple and fun way to add a touch of color and style to your home decor. With just a few basic sewing supplies and about half a yard of fabric, you can create a beautiful and unique pillow cover.
Whether you choose to embellish it with embroidery, pom-pom trims, or leave it plain, this sewing project is perfect for beginners. So why not give it a try and elevate the look of your couch or bed with a custom-made envelope pillow cover?